Printing and Emailing a Dunning Letter
Summary
In this article, you will learn the steps to generate a dunning letter and a dunning control report for review and printing, as well as to email a dunning letter to a customer.
Body
Overview
Dunning letters are generated and sent to customers as reminders to pay invoices they have received. The letters include information on current balances which includes unpaid charges, the age of those items, and the remaining balance shown.
This article contains information on how to print or email a dunning letter.
In this article, you will learn the steps to generate a dunning letter and a dunning control report for review and printing, as well as to email a dunning letter to a customer.
Prior to this process, please view the tutorial Creating a Dunning Letter Extract.
Note: This article was created using sample values. Actual values may differ in the production version of the UGA Financial Management System.
 |
First log onto https://financials.onesource.uga.edu/
On the UGA Financial page, click the Classic Home tile.
|
|
 |
To navigate to the Print Letter page, select:
Main Menu > Accounts Receivable > Customer Interactions > Dunning Letters > Print Letter
Click the Print Letter link.
|
|
 |
The Print Letter page is displayed.
|
|
 |
On this page, you will enter the Run Control ID for printing a Dunning letter.
A Run Control ID is an identifier that uniquely identifies the process you are running. The Run Control ID defines parameters that are used when a process is run. This ensures when a process runs in the background, the system does not prompt you for additional values.
Note: You will use the same Run Control ID for creating future dunning letters.
Enter the appropriate information into the Run Control ID field.
Example shown here: enter "AR_DUNNING_LTR_PRINT".
|
|
 |
| Click the Add button. |
|
 |
Enter the appropriate Dunning Number into the field.
To locate the Dunning Number of the letter you wish to print, click the lookup magnifying glass next to the Dunning Number field.
|
|
 |
The Look Up Dunning Number dialog box is displayed.
Click the appropriate Dunning Number link.
Example shown here: click "4" .
|
|
 |
| Click the Run button. |
|
 |
|
The Process Scheduler Request dialog box is displayed. You can select the parameters to use to schedule the report request and process the output format.
|
|
 |
|
The Server Name field will default to the appropriate Server Name. Leave the Server Name field as it is.
|
|
 |
In the Process List section, click the checkbox next to the Dunning Letters - All Levels item.
|
|
 |
Click the checkbox next to the Dunning Control Report item.
|
|
 |
Click the Process Monitor link.
|
|
 |
|
The Process List page is displayed. You can view the status of submitted process requests.
|
|
 |
|
The current run status of the process is Queued. If the Run Status field displays Success , it means that the process is finished.
|
|
 |
Click the Refresh button until the Run Status displays Success.
Note: You may have to do this several times until the process has finished updating the transaction.
|
|
 |
|
The Run Status field displays Success. This confirms the dunning letter print process has completed successfully.
|
|
 |
Click the Go back to Print Letter link.
|
|
 |
Click the Report Manager link.
|
|
 |
The List page is displayed. You can select reports you wish to print.
To update the page with the reports that you just processed, click the Refresh button.
|
|
 |
|
The Reports section is updated with the reports you processed in the previous steps.
|
|
 |
Click the Main Menu link.
|
|
 |
Navigate to the Collections Workbench:
Main Menu > Accounts Receivable > Collections Workbench
Click the Collections Workbench link.
|
|
 |
|
The Collections Workbench page is displayed.
Note: The SetID and the Unit fields are pre-populated with the parameters you set in the previous steps.
|
|
 |
Enter the appropriate information into the Customer field.
Example shown here: enter "100242".
|
|
 |
|
The search result is displayed in the Customer Details section.
You can view the detailed information about the selected customer.
|
|
 |
Click the Correspondence tab to view the dunning letter for review and printing.
|
|
 |
|
In the Statement History section, you can search for a statement using its Statement Number and/or Statement Date. You can also view the Statements associated with the selected customer.
|
|
 |
|
In the Dunning Letters section, you can search the Dunning History by entering the Dunning Number and/or Dunning Date. You can also view the dunning letters associated with the selected customer in this section.
|
|
 |
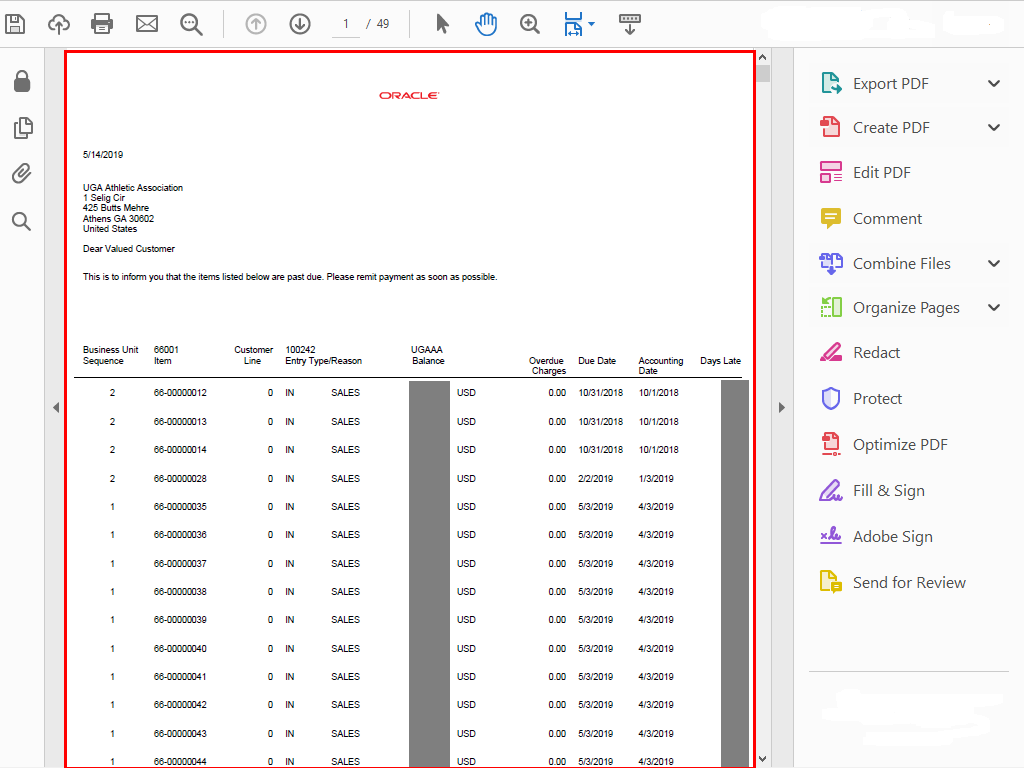
To open a PDF file for the selected dunning letter, click the associated Dunning Image icon.
|
|
 |
|
The PDF file for the selected dunning letter is displayed. You can review, save, and print the dunning letter using the Adobe program.
After you review the letter, you can close your browser to return to the Collections Workbench page.
|
|
 |
Back in the Collections Bench, you can also email the dunning letter to others.
Click the Email icon.
|
|
 |
|
The Send Dunning Letter dialog page is displayed.
|
|
 |
Enter the recipient email addresses into the To field.
Example shown here: enter "12345@biz.com".
|
|
 |
|
If needed, enter additional recipient email addresses into the CC field.
|
|
 |
|
By default, your email address is displayed in the BCC field. You can add additional email addresses in the BCC field.
|
|
 |
|
The Subject and Message fields are pre-populated. You can modify these fields if you wish.
|
|
 |
|
By default, the selected dunning letter is already attached to this email. You can check if the attached letter is correct before you send an email.
|
|
 |
After you have populated all the necessary fields, click the Send Email button.
|
|
Details
Details
Article ID:
149294
Created
Sat 9/24/22 11:10 PM
Modified
Tue 9/1/26 9:11 AM